
Chatter is caused naturally by the frequency at which a tool cuts particular materials. Many factors can alter the natural frequency of the cutting tool, such as the toolholder, cutter tooling, and part fixtures. To avoid chatter, it is important to balance all rotating tools. In some cases, the natural frequency of the cutting tool can be controlled by balancing the cutting tool and the workpiece. A glaze is a liquid suspension made of finely ground minerals. It is applied to ceramicware before it is fired at a temperature that makes it durable and resists warping.
Bow lathe chatter tool
The Chatter Tool for a Bow Lathe was designed to produce a variety a decorative patterns on turns. The cutters made of spring steel vibrate while in use. They can be ordered with either square or hollow ends. The Sorby Chatter Tool is 4 inches long and best suited for dense hardwoods. Here are a few tips to help prevent chatter. For woodworking projects involving intricate patterns or complex curves, you should use this tool.
Robert Sorby chattertool
Robert Sorby's wood-lathe chatter tools is an effective tool for turning wooden. It can produce many different patterns on the finished grain. There are four types: convex (pointed), concave (concave), and convex (convex). This is a better choice for hardwoods, because it produces finer decoration then a saw. The cutters can vibrate in the use of their spring steel construction.
NOVACAM non-contact 3D metrology system
Novacam's 3D non-contact metrology system can measure chatter accurately in any part of the body, including the ID. Novacam 3D measurement systems can be used to measure surfaces in a point by point manner thanks to their low-coherence, interferometry technology. They can measure upto 100,000 points per second and produce over 1,000,000 3D measurement points. Novacam system's data collection software makes it simple to automate scanning and measurement as well as data analysis. Novacam users can modify scanning definitions, measurement patterns, and subsequent reporting in mere minutes.
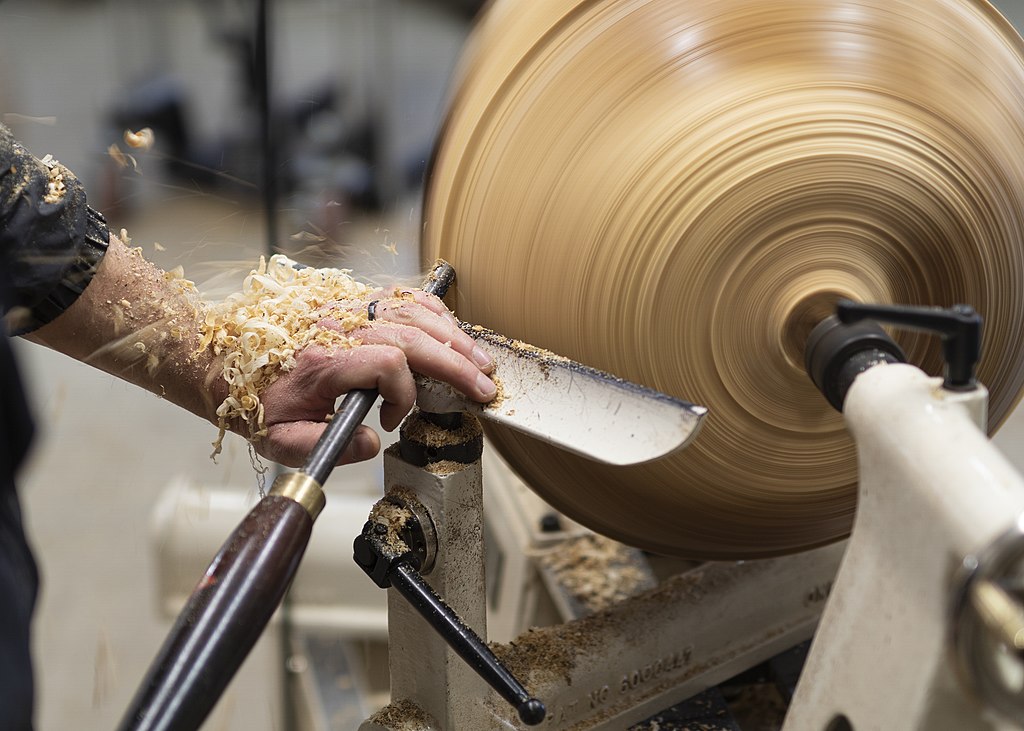
Unequal lathe
If your wood lathe is experiencing chattering, you may be turning a piece that is not balanced. You can blame a variety of factors including the type and direction of the wood used, how fast you turn, and what speed you use to cause the chatter. Chatter can often be a sign that you are not properly balancing your tools or using the right tool. Follow the instructions in your manual. Chattering could also be caused by a defective workpiece or dull cutting tools.
Locking lathe slides
You can prevent wood lathe chatter by locking the slide properly. This can be done by attaching the appropriate tool post. If the slide cannot be locked, the tool may sway and make chatter. Lock the post by using a bolt nut to prevent this. Chatter grease is another option to increase the support of the tool. You can prevent chatter on the wood lathe by locking it properly. It will also improve its functionality.
Use a chisel
A good woodwork tool is the chisel. The cutting edge should always be sharp and the back must be perfectly square. To achieve maximum success with chisels, you need to spend the time to polish them. Before using them, test their sharpness in softwood to determine if they're cutting smoothly. If the chisel is too sharp, it'll shave the wood and tear the end grain.
Wood lathe chatter can be made by using a boring toolbar
A boring bar is used to produce chatter for a wood turning lathe. Choosing the wrong tool can cost you dearly. Boring bars can be 10x more costly than plain steel bars and must be gripped with four times their size. Vibration is the problem. Do not use vibration dampening tools if your lathe is rattling.
FAQ
How much should a hobbyist invest to get started?
If you're looking to start your own woodworking business, you'll probably need some capital to buy the necessary tools and supplies. You can start by purchasing a small table saw and drill press as well as a circular saw, circular saw, jigsaw and sanding machines. These items are affordable so you won’t break the bank.
Can I make my living doing this job?
Yes! Many woodworkers do. According to the U.S. Bureau of Labor Statistics' (BLS), in May 2012 the median annual wage of woodworkers was $34,000 That's higher than the national average of $31,000 per year.
Do you have the skills to learn woodworking?
Learning by doing is the best way of learning anything. Woodworking is an intricate art form that requires practice, skill, patience, and experience. To master any craft, it takes time.
The best way to learn how to do something is actually to do it. Start small and use what you learn.
Statistics
- If your lumber isn't as dry as you would like when you purchase it (over 22% in Glen Huey's opinion…probably over 10-15% in my opinion), then it's a good idea to let it acclimate to your workshop for a couple of weeks. (woodandshop.com)
- Most woodworkers agree that lumber moisture needs to be under 10% for building furniture. (woodandshop.com)
- The best-paid 10 percent make $76,000, while the lowest-paid 10 percent make $34,000. (zippia.com)
- Woodworkers on the lower end of that spectrum, the bottom 10% to be exact, make roughly $24,000 a year, while the top 10% makes $108,000. (zippia.com)
External Links
How To
How to make wood joints
This tutorial will demonstrate how to join two pieces together of wood. We'll use the "pocket hole joint," which means we drill holes in the wood and then glue them together. This works well if the wood is straight and smooth. You might consider dowel joinery if your wood isn’t straight or flat. Here are the steps
-
Drill Pocket Hole Joints. Start by measuring and marking the spot where the pocket hole joint will be placed. You will then drill 3/4" deep holes through each piece of wood with a jigsaw, handheld drilling machine, or hand-held drill.
-
Sand Smooth. Sanding the edges of the wood will help to prevent the joint from splitting later.
-
Glue the two sides of the wood together. Apply glue on both sides of the wooden plank. Let the wood sit for 5 minutes, then clamp it together.
-
Secure the pieces together. After the glue has dried completely, you can clamp the pieces together until they are flush.
-
Trim Joinery. Trim the excess wood around the joint after the glue has dried completely.
You should leave enough space between the pieces to allow you to turn them inside-out.