A beginner woodcarver might not know where to begin. Here are some tips and tricks to help you get started with your first animal carving job.
Dog
If you are an aspiring woodcarver, you will definitely benefit from the numerous free dog wood carving patterns available online. These patterns will guide your carving of your dog in a variety styles and dimensions. These are some of the tools needed to carve your canine friend. A band saw or the coping saw are necessary, along with chisels, mallets, and time to polish. Then, you'll be ready to begin carving!
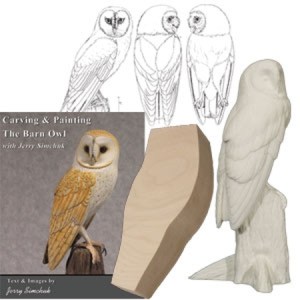
Eagle
Native Americans consider the bald eagle a symbol of strength, courage and wisdom. It was about 20 inches across by five inches wide. The eagle today is a popular choice in wood carvings. There are many woods that can be used to carve eagles, including modern and antique. This article will show you some of the most common wood carving styles.
Bear
Carving a bear is simple and straightforward. Each line carries more weight. For added visual interest, the bear's front paws are placed opposite the leg lines. Consider buying a book to help you learn how to carve a bear if wood carving is new to you. James Miller's book describes the entire process.
Elephant
An elephant wood carving is a stunning way to add character to any home. 1stDibs sells 56 antique carved wood Elephants and two modern pieces. These pieces date back to the 19th century and have gained popularity in recent years. You have the option to choose from Art Deco or Mid-Century Modern styles. Or, you can pick a smaller piece that will add a subtle touch of elegance to your home.
Moose
You can carve a moose head or antlers by using moose antlers. Moose antlers and paddles attach to dowels. You'll need to push them in and possibly glue them in place. You can then paint the moose using a walnut gel stain, or you can use paint to color it.
Template for moose
A moose carving templates helps carvers to create realistic-looking carvings. You can use paints to color your moose carvings. After learning the basics of carving this animal, it's not difficult. For the final touch, add details like fur and eyes with a brush or a typhoon bit on a die grinder. The Moose template is ideal for beginner wood carvers who want to carve an animal.
Bear template
To start carving bear wood, you will need a template. To explore the wood's features, you can use a Dremel to create a template. This tool allows you to use stop cuts in order to separate the legs from their lower bodies. To indicate the split, you can make V-cuts in your legs. After completing the ear and leg parts, you can round the underbelly. For the bear's final shape, you will need to leave some space at its back.
Eagle template
Three detailed templates are needed to carve an adult eagle. The first template is used for carving. The second template will serve as a working paper template. It will be cut to create transfer patterns. As a reference, the third template will be used. You will then use the available tools to cut out the main lines. It is important to ensure that you align the lines with the pattern line. Make sure that you align all of your marks.
Template for the mouse
Wood carving is a fun hobby. There are many different designs that you can choose from. This task will be easier if you use a template. You can also download patterns to assist you. A simple geometric pattern is a good starting point if you're just beginning. You can then move on to more complex patterns as you learn. Once you are comfortable with the basics, you can move on to the next step: creating the perfect mouse.
FAQ
What types of woods are best for furniture making?
Woods are classified according their hardness. Softwoods can be pine, fir or cedar. They're often used for outdoor furniture because they don't rot easily. These hardwoods include maple, mahogany and teak. They're generally used indoors because they won't weather well outdoors.
How can a beginning woodworker make a living?
Many people are starting to learn how to build furniture because they want to start an online business. If you are just starting to build furniture, there are many other ways to make money than selling on Etsy. You could sell at craft fairs or local events. Offering workshops could be another option for those who are interested in learning how to build their furniture. You might be able to offer services like remodeling homes or making custom pieces for clients if you are a skilled carpenter.
How do I know what tools are best suited for me?
When shopping for tools, it helps to think about your needs and preferences. What do you prefer: metal or plastic handles? What size of nails and screws do your hands use most? Are you comfortable with power tools, or would you rather use hand tools?
What are the basics of woodworking?
You can start building furniture by making a bench. This project can be completed with whatever wood you have available at home. If you're not sure which kind of wood to choose, you can purchase cheap pine boards at Lowes and Home Depot. Once you have built your bench, you will need to sand it off and then finish it with a stain/varnish.
Statistics
- The U.S. Bureau of Labor Statistics (BLS) estimates that the number of jobs for woodworkers will decline by 4% between 2019 and 2029. (indeed.com)
- Woodworkers on the lower end of that spectrum, the bottom 10% to be exact, make roughly $24,000 a year, while the top 10% makes $108,000. (zippia.com)
- If your lumber isn't as dry as you would like when you purchase it (over 22% in Glen Huey's opinion…probably over 10-15% in my opinion), then it's a good idea to let it acclimate to your workshop for a couple of weeks. (woodandshop.com)
- Average lumber prices rose about 600 percent between April 2020 and May 2021. (familyhandyman.com)
External Links
How To
How to drive a nails in wood
It is essential to pick the right size and style of hammer before you can drive a nail in wood. The most commonly used types of Hammers are claw hammers. Each kind of hammer has its own advantages and disadvantages. A clawhammer works best when hitting something hard like nails. However, it can sometimes be difficult to see exactly where the strike is going. Although a sledgehammer can be used to hit large areas quickly, it is too heavy to be useful for small tasks.
After you've chosen the right tool, hold your hand flat to the handle so it rests comfortably in one of your palms. You can grip the handle with your fingers, but not so tight that it causes injury. Hold the hammer straight up, keeping your wrist relaxed. Swing the hammer back towards the ground, with your aim at the middle of the nail. You should feel the impact of the hammer striking the nail. Try swinging a hammer using a block wood to practice until you are comfortable.
The hammer should be held close to your body when you are ready to begin driving the nail. Place the nail so that it is perpendicular with the wood's surface. Keep your focus on the tip of each nail. Move the hammer forward and then continue to move the hammerhead. You can repeat this several times, increasing your swing speed. When you are confident with the technique, add power to your swings. Hold the hammer high above your shoulders and pull it down. You'll have more energy to work with.
Once you have made the first hole, remove your hammer. To pull out the remaining nails, use a screwdriver or pry bar. Keep the nail heads parallel to the board's surfaces in order to avoid splitting wood.