This article will describe the methods involved in woodturning an inlay. We'll also discuss the materials used and how to maintain them. Learn how to make a mortise, inlay and upcut using a rotary tool handpiece. Learn more. It's easy to do! This simple yet rewarding project should be a joy! Woodturning projects are incomplete without inlay.
Techniques
Inlay techniques are an important part in any woodworking project. They can add character and beauty to the finished product, as well as enhance its aesthetic appeal. There are many methods to create beautiful inlays. Each of these has its own advantages. This article will explain the various options. Continue reading for more information! To begin, you'll need to prepare the wood. With a moist rag or paper towel, clean it well. You may want to apply some mild dish soap to remove dirt and other residue. Use chemicals with care as they can cause damage to the wood. You may also consider hand tools when removing the wood from routers.
Inlay techniques can be applied to other materials. One example is stone, metal, or wood. If done correctly, inlaid pieces add a wonderful contrast to the piece. There are many inlay tools available, including knives, fixtures, and jigs to secure inlayed components in place. You can inlay the wood before or after it is turned. After turning the piece, inlay materials can be added to the top and bottom.
Materials
The versatility of the inlay materials you choose to cover your finished object's surface will increase its visual appeal. Inlay materials can cover many types recesses such as those made by the lathe or natural cracks. Inlay materials can be used to cover brad nails or screw heads in some cases. To create these beautiful inlays, follow these steps.
The first step in creating an inlay is to decide on a material. Certain materials are better suited to this purpose than other. People may feel more comfortable using resin inlay, which doesn't require you to cut intricate pieces or fill in gaps after mortises were made. It is also possible to get resin in a variety of colors, which can sometimes make it magical. Here are some tips to use resin as an inlay material.
Installation
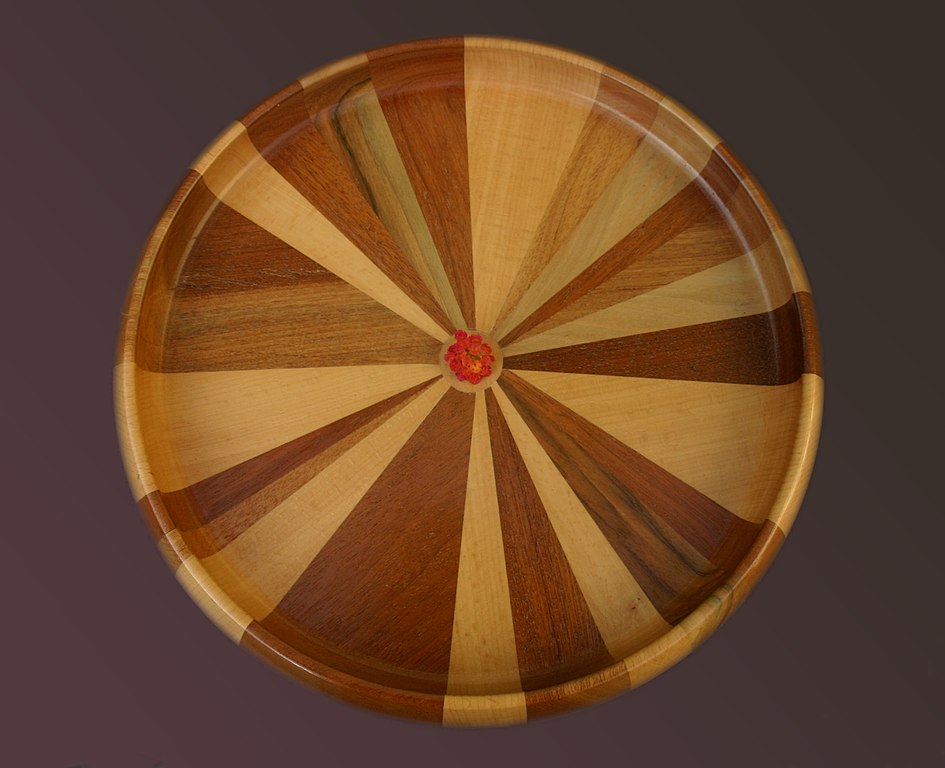
Inlaywork is a decorative method that can be added to woodturning objects. Ron Hampton provides detailed instructions for woodturners on how to inlay woodturning. He demonstrates the steps involved in installing inlays on bottoms and tops. He also discusses safety and precision. This technique gives wood turnings a unique look. Woodcraft offers a variety of inlay bands.
First, prepare the base for the woodturning insert. A plunge router is the best choice for the best results. Attach the template guide at the router's base. Make sure the bushing is in the proper position around guide collar. Make sure that the base is flat after placing the inlay. The angled edges of the inlay will make it easier to install. Installing the inlay will be easier if you use a router that has a bit that is slightly larger than the size of the mortise.
Maintenance
These are the steps for woodturning inserts maintenance and care. Clean your inlay thoroughly before you place it in your woodturning job. This is especially important if you use CA glue for stones inlay. If you have a small space, you can also use a 3/16" allen wrench to gauge the depth of the inlay. Sand your inlay down to 120grit. This will prevent scratching.
FAQ
What's the difference?
Hobbyists are passionate about making things from wood, while professionals tend to be more focused on the quality and craftsmanship of their work. Hobbyists take great pride in their creations, and share them with family and friends. Before they start working on a project, professionals will spend hours researching the designs. They will pay attention to every detail, from selecting the best materials to finishing the project perfectly.
What kind of tools are used to carpenters?
A hammer is the most commonly used tool by carpenters. A hammer is used for pounding nails into wood. They can also use it to hold the pieces together as they work on a project. Other tools include clamps. pliers. screwdrivers. measuring tape. pencils. saws. drills. wrenches.
Which woods are good to use for furniture-making?
Woods are classified based on their hardness. Softwoods are pine, cedar and cypress. Because they are resistant to rot, softwoods are often used as outdoor furniture. The hardwoods include teak, maple, mahogany and oak. Because they can't weather outside, they're usually used indoors.
What is the average time it takes to finish furniture?
It depends on the type of wood you choose, the complexity of the design, and the amount of finishing you apply. Hardwoods are more difficult to maintain than softwoods. Hardwoods can also be more costly than softwoods. But they last longer, and resist moisture better. It takes between one and three months to finish a piece.
Statistics
- In 2014, there were just over 237,000 jobs for all woodworkers, with other wood product manufacturing employing 23 percent; wood kitchen cabinets and countertop manufacturing employing 21 percent. (theartcareerproject.com)
- If your lumber isn't as dry as you would like when you purchase it (over 22% in Glen Huey's opinion…probably over 10-15% in my opinion), then it's a good idea to let it acclimate to your workshop for a couple of weeks. (woodandshop.com)
- Overall employment of woodworkers is projected to grow 8 percent from 2020 to 2030, about as fast as the average for all occupations. (bls.gov)
- Most woodworkers agree that lumber moisture needs to be under 10% for building furniture. (woodandshop.com)
External Links
How To
How to use a handsaw correctly
Hand saws can be used to cut wood into small pieces. The most common types of hand saws are circular saws, jigsaws, table saws, band saws, saber saws, crosscut saws, miter saws, and rip saws. A hand saw is a tool made from metal or plastic which cuts material such as wood, plastics, metals, etc.
The main advantage of using a hand saw is its ability to make precise cuts at any angle without adjusting the blade. They are also easy to sharpen, unlike power tools. But there are disadvantages. They can be very heavy and bulky so it is important to take care when you transport them. You could also injure your self if you don't know how to use them.
There are many ways you can hold a saw. While cutting, it is important to keep your hands clear of the blades. If you don't, you might get hurt. You should hold the saw with your fingers close to the handle. Your thumb should be at the top of your blade. You won't accidentally touch it.
When using a hand saw, you should never put anything under the piece of wood you're cutting. The blade could slip if you do this. Before you start cutting, ensure that you inspect the area. Ensure no nails, screws, or other objects are underneath the wood.
You should always wear safety goggles when working with a hand saw. They keep dust out of your eyes, making it easier for you see what you are doing. Safety glasses also protect your eyes from flying debris.
To work safely with a handheld saw, you need to first be able to operate it. After that, practice until it becomes comfortable enough to start cutting. Once you master the basics you'll be able to easily cut most anything.