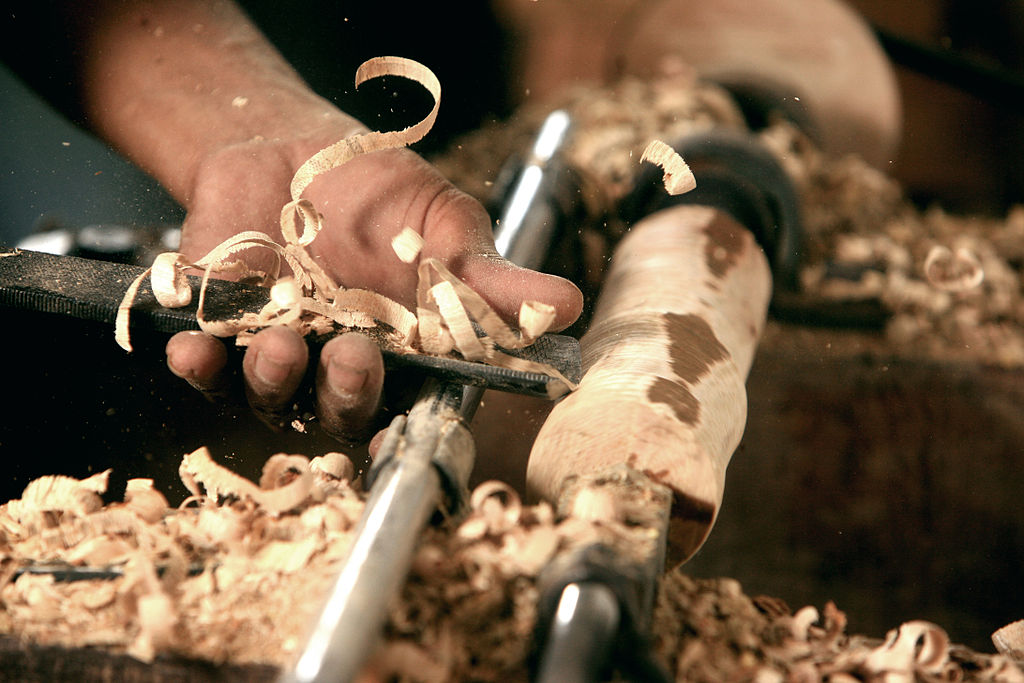
A bowl gouge is a tool that can be used to smoothen or carve the surface of a bowl. You can do a variety of tasks with the gouge depending on its shape and size. The gouge comes with an instruction leaflet. It comes with a forge tip that can be used to make rough cuts in the interior or outside of a bowl. It also features a balance edge and edge to aid in fine projects. It is made from top-quality steel.
Form
A bowl gouge, a sharp tool used to shape bowls, is an extremely useful tool. It is usually made of wood, and can be quite costly. You can purchase a gouge from the home center for a few dollars. This wood is flexible and can be cut in several ways. To get started with bowl making, a simple 2x6 section may be an option. This is an affordable option that is easy to use and is great for beginners.
There are many shapes of bowl gouges. A basic bowl-gouge is 5/8 inch in diameter. A 3/4" gouge is slightly larger. While larger tools are usually more efficient, they do not necessarily translate to a better tool. You should experiment with different sizes and gouges until you find the right one for you. Every turner has a preferred grind. You should experiment with various tools until you find the one that works best for them.
Size
There are two primary systems for sizing bowl gouges. English and North American systems determine the size of gouges by their diameters and flute width. The same gouge in one system is labeled as 1/2'' while the other uses 5/8" or 1" diameter. This makes it easier to select the right size lathe for you. To choose the proper bowl gouge, first determine the diameter of the bowl you're working on. Then, choose the appropriate size based on the size of the bowl or the gouge's flute.
A larger bowl gouge has many advantages, but they are heavier and more bulky than smaller ones. Beginners should start with a smaller bowl gouge and gradually increase in size. However, for more experienced woodworkers, you should never limit yourself to a single size. Once you master your woodworking skills, you can invest in larger bowl gouges if you wish. The bowl gouges made of carbon steel are more durable than stainless ones, but they require more maintenance.
Function
A bowl gouge performs two functions. It prepares the outside surface to be sanded. The tool rest supports the left wing. The cutting edge comes in contact with the wood once the handle has been raised. The cutting edge moves away from the wood to reveal a smooth and ready-to-sand finish. A bowl gouge only has one cutting edge, which is the bevel.
The bevel angle of a bowl gouge can vary between 40 and 45 degrees. This can vary depending on the situation. For instance, deep bowls can be turned best with large bevel angles. For cutting beads or spindles, you can use smaller angles. The best angle to use depends on the purpose of your tool. It can be hard to achieve a good bevel angle without damaging the wood.
Handle
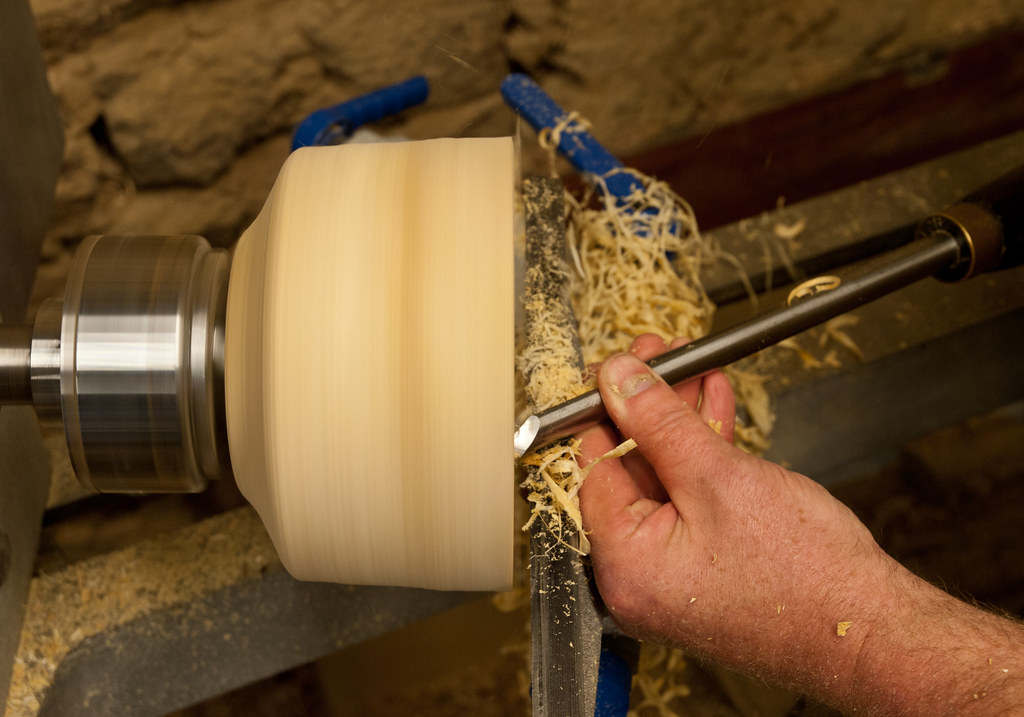
When cutting bowls, you should always keep the bowl gouge handle against your body for support and to control the curvature of the bowl. Swing the handle to create a convex curve in the bowl, while holding the tool rest firmly with the left hand. Adjust the tool-rest height so that you are able to work at the desired depth and width. Depending on the dimensions of the bowl, a sharp saw should be able cut up to 1 inch into the bowl.
A bowl gouge looks like a bowl. It is made from a steel rod, which is then ground into a suitable shape. It usually has a concave area, or flute, that is hollowed out during the milling process. While some bowl gouges come with handles made of hardwood, there are other options. Some bowl gouges are equipped with large handles that make it easy to work on large areas.
FAQ
Where can I buy woodworking supplies?
You can find everything you need in many places. You could shop at your local hardware store or go online to Amazon.com.
You might also consider flea markets and garage sale for any old furniture or other materials you could reuse.
How can I learn basic woodworking skills
It is an excellent way to learn how to build furniture. You can make a simple bench yourself. This project can easily be done using whatever wood you have at your house. If you don't know what kind of wood to use, then go ahead and buy some cheap pine boards from Home Depot or Lowes. After building your bench, sand off any rough edges and apply a stain or varnish.
Where can I purchase hardwood lumber?
You can buy hardwood lumber at Home Depot. They sell all kinds of wood products, including flooring, cabinets, furniture, etc.
A wide range of engineered hardwoods are also available, such as Ipe and Brazilian Cherry (Pau d'Arco), Mahogany and Swietenia Macrophylla.
These woods can be found online by searching for "hardwood lumber" in Google.
Can I refinish furniture that I make?
Yes! Yes! There are many methods to refinish antique furniture without hiring a professional. Here are some examples:
To remove stains and scratches, use sandpaper. After that, use a clean towel to wipe the surface.
Clear polyurethane varnish should be applied. Before moving furniture, let dry completely.
Acrylic paint can be used to paint furniture.
Stain can be used instead of paint. The furniture will have a rich look thanks to the stain.
Shellac wax is applied. Applying wax will give the wood shine and protection.
How do you know which tools are the best for you?
When shopping for tools, it helps to think about your needs and preferences. Are you more comfortable with plastic or metal handles? What size screws and nails do you use most often? Are you more comfortable using power tools than hand tools?
What is the difference in a hobbyist and professional woodworker?
Hobbyists like making things with wood. Professionals focus more on quality. Hobbyists are proud of their creations and will often share them with family members and friends. Before they start working on a project, professionals will spend hours researching the designs. Professionals will be meticulous about all aspects of their work, from selecting the right materials to finishing it.
How do I determine what kind of wood my project is made from?
Always inspect the label when buying wood. It should have information about the wood species as well its moisture content and whether any preservatives were used.
Statistics
- The U.S. Bureau of Labor Statistics (BLS) estimates that the number of jobs for woodworkers will decline by 4% between 2019 and 2029. (indeed.com)
- The best-paid 10 percent make $76,000, while the lowest-paid 10 percent make $34,000. (zippia.com)
- Overall employment of woodworkers is projected to grow 8 percent from 2020 to 2030, about as fast as the average for all occupations. (bls.gov)
- Average lumber prices rose about 600 percent between April 2020 and May 2021. (familyhandyman.com)
External Links
How To
How to stain wood
Stain wood is a process that involves applying chemicals to the surface of wood, which changes its color. This chemical reaction causes wood to turn from whiteish to brownish. While oak is the most widely used type of wood for staining purposes, other types of wood are also available.
There are many ways to stain wood surfaces. One method involves mixing the stain and a solvent and then spraying it on the wood. Some methods involve a mixture of water and dye that is applied directly to the wood. Stains can also be mixed into paints and varnishes, becoming part of the finish coating.
Preparing the wood surface is the first step to staining it. The wood must be thoroughly cleaned to remove all grease and dirt. Sanding the wood smooths out rough spots and scratches. Then you must decide what kind of stain you want to use. There are two main kinds of stains available: non-penetrating stains and penetrating. Penetrating colors penetrate deeper into wood than those that are non-penetrating. This makes them more suitable for darker colors, such as mahogany. The best non-penetrating colors are those that work with light colors like maple.
Once you have decided on the stain type that you want, get your tools ready. A paintbrush works well for applying stains because it allows you to spread the liquid evenly across the surface. After you're done painting, make sure to have some rags handy to remove any excess stain. You should have enough containers to store the various components of the stain mixture if you intend to mix it yourself.
Once you have prepared all your materials, it is time to clean the areas where you will stain the wood. Use warm water and soap to clean away dirt and dust. Wipe the entire piece of furniture with a rag dampened with clean water. Be sure to get rid of all loose material, especially if staining is planned for darker wood.
Next, spray the stain. Begin at one end and spray or brush the stain on the wood. Work slowly and carefully, moving back and forth along the grain of the wood until you reach the opposite end. The stain should not drip off of the wood's edge. Allow the stain to dry completely before you move on to the next step.
Apply a clear polyurethane sealant to protect the painted surface. Three coats are recommended for polyurethane. Allow the third coat to dry overnight before sanding the final coat.